~~TOC~~
Configuring SymPhoTime64
When do you need to configure SymPhoTime64?
This configuration is done by PicoQuant when you purchase a complete system. Configuration of SymPhoTime 64 by the user may be required when you want to:
- upgrade SymPhoTime64
- change from SymPhoTime to SymPhoTime64
- to use SymPhoTime64 with a “home-made” set-up.
Before Proceeding:
These short instructions assume that :
- All hardware modules relevant to the SymPhoTime 64 (SPT64) are correctly installed in the PC. THese modules could be Laser Drivers, Piezo Controllers, TCSPC modules, PCAN controller card, Framegrabber card etc.
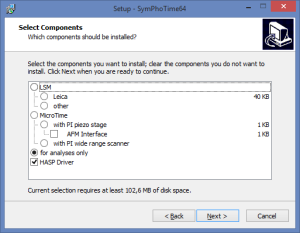
Please check that they are recognized correctly by opening the device manager window. - SymPhoTime 64 is installed correctly in the PC. When installing SymPhoTIme the user has to choose the exprimental set up type for which the SymPhoTime 64 will be used.

1. Configure Mode and Hardware Settings
- Open SymPhoTime64 in the Configure Mode

- When SymPhoTIme is open go to Settings→Hardware Setup
- The Hardware window will open in which you can see all the relevant hardware modules.
Note: different options depending on using the SPT64 with an LSM upgrade kit or a MicroTime

2. Settings for both Microtime and LSM upgrade kits Users
- TCSPC : Use the drop down menu to select the proper TCSPC module then click “Init.TCSPC”.
- Light-Source driver: Use the drop down menu to selct the proper Light-source driver and press on “Connect”.
- You can set up the Laser Heads by pressing “Setup Heads” and a new window will pop up:

You can set:
- the name of the laser head,
- the nominal wavelength of the laser head
- Min: minimum value of the intensity of the driver module (usually at the lasing threashold)
- Max: maximum value of the intensity of the driver module (usually 100%)
- Def.: Default value. This value will be selected when the laser is selected via the SymPhoTIme64 as a statrting value for the intensity of the driver.
- CW: enable if the laser can run in CW mode
- Max. frequency: Maximum allowed repetition rate for the laser in the pulsed mode
Do not forget to press “Save Head” after setting up each Laser Head“
3. For LSM upgrade kits
Go to the SymPhoTIme Manual page 6 under “Setting LSM scanner configuration for SPT64”. Choose the correct settings for the Scanning Markers according to the manufacturer of the LSM.
When using scanners not configured by PicoQuant, make sure that the scanning markers are set according to the output of the scanning controller.
Please do not forget to enable the “Remote Interface” option. Then you could use the Remote Controller software by installing it to the LSM computer. SymPhoTime 64 Remote Controller
4. For Microtime 100/200
- Initialise the scanner. It is usually in COM ports 1-3 . If there is a Z scanning option please enable the “Init Z axis” box before you click on “Init. Scanner”
- Initialise the CAN device (controll of shutters) by pressing the “Connect” button.
5. Close the SymPhoTime64 Configure Mode and Save Configurations
- Press “Save as Default” at the bottom of the Hardware window and then close the Hardware window.
- Press “Save Defaults” in the main window of SPT64.

- Now you should be able to see the TCPSPC and Laser settings within the SPT64.


- When you close the SPT64 you will have to confirm the changes in the Hardware Setup. Click Yes

- After clicking “Yes” you would be asked to insert the serial number of your system and the ID of the user who made the changes.
6. Start SymPhoTime64 in normal mode and Save Configuration
- Restart SPT64 and go to Settings→ Save User Configuration.
- Save the file to a folder so that you can have it as a back-up in case the settings are lost.
- Now you are ready to measure!
- Please note that regardless if you like to acquire a measurement or perform analysis you will have to do so in a “WORKSPACE“. You can create a new workspace or load goint to File→…

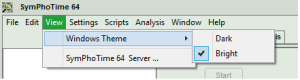
Bright/Dark Window
- You can easily choose to have the “dark” colored SPT64 window or the “bright” one.This is done as follows