~~TOC~~
TCSPC modules and External Markers
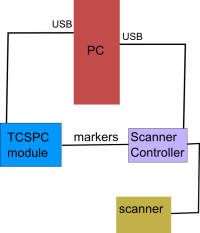
Here a general scheme for guiding external markers to the TCPSC modules will be illustrated by addressing the case of getting the markers from a controller of scanning module to the TCSPC module.
The markers are incorporated into the raw data according to the principles of Time Tagged Time Resolved Data Registration (TTTR) but they should be also physically “fed” to the TCSPC module.

Step 1: Know the marker signals
Check the documentation of the scanner controller or contact its manufacturer to determine what exactly are the markers delivered by it ( For example Line start, Line Stop , Frame Start , etc. ) and their cahracteristics (voltage amplitude? standard TTL signals ? ).
Check the type of the output connector and check which pin of the output connector delivers which marker.
What type of signal is delivered?
Step 2: What does the TCSPC module expect?
All TCSPC modules provided by PicoQuant expect standard TTL pulses for the external markers. This means 2-5 V for a logic “high”-level and 0-0.8 V for a logic “low”-level. For more info about TTL signals see here.
Please go to manual of the TCSPC module (PicoHarp 300, TimeHarp 260, HydraHarp400) and search about “external markers” and “connectors”.
or go directly to
- PicoHarp manual: Check pages 34-35 and 67-68 . (For the combined use with a PHR800 router also take a look at the PHR800 manual for additional options regarding connectors)
- HydraHarp manual: Check pages 32-33 and 67.
- TimeHarp manual: Check pages 34-35 and 69.
- MultiHarp manual: Check pages 33-34, 57 and 69-71.
Step 3: Make the connection
After STEP 1-2 you should have a diagram which PIN of you controller goes to which input of the TCSPC module.
Probably this mean that you have to construct a cable your self.
Please note that PicoQuant has the proper cables for
- PI Controller: E725
- PI Controller: E710
- PI Controller: E727
- Controller: C867.2U2 (PI wide range scanner)
- Controller: C867.262 (PI wide range scanner)
which have been used in PicoQuant systems before and also MadCity labs can help you getting the proper cable for their stages.
Step 4: Image Acquisition
The “bumpy” road (not recommended for inexperienced programmers)
Assuming that you get the cable connection etc. You will be able to work in T3 mode , markers will be registered in the raw data but still you will have to construct a home - build software if you want to have some online preview on the image while scanning and also extract the data you would like to use during the analysis.
For this you should use the DLL of the corresponding TCSPC module and control its acquisition parameters. Please note that the DLL option is enabled by default only for the HydraHarp 400 and the MultiHarp 150 and should be purchased as a seperate module for the TimeHarp 260 and the PicoHarp 300. For further infos and ideas have a look inhttp://tcspc.com/doku.php/software.
The easy way (for any given scanner-controller)
One can buy the SymPhoTIme 64 software which can be operated in a “slave” -mode…This means you controll all the scanner parameters with your home-made programm but the Online Preview of the image acquisition in the T3 mode and the analysis is done by our software.
Keep in mind that SymPhoTime 64 can be remotely controlled
https://github.com/PicoQuant/SymPhoTime_Remote_Interface
The easiest way (just for the scanner-controller supported)
One can use the SymPhoTIme64 software in a “master” mode… This means one sets the acquisition parameters in SymPhoTime64 and then the software transfers this request to the scanner conroller.
This is only possible for a limited number of controllers.
For a list see here http://tcspc.com/doku.php/software:supported_mt200_pc_configuration_for_symphotime_64
Further Questions?
Contact PicoQuant Support.