Table of Contents
This is an old revision of the document!
How to perform Antibunching Measurements
Emission Filters
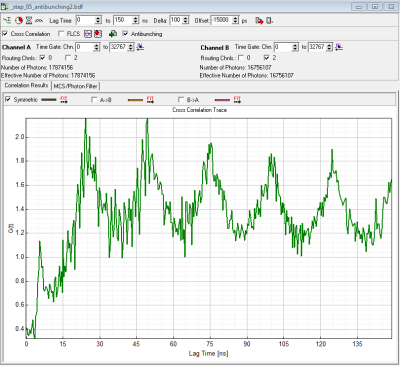
During Antibunching Measurements the afterglow effect of the SPADs may become visible as (un)expected additional peaks near the expected antibunching dip (see figure 2). These peaks might be useful to find the location of the dip, they are however artifacts caused by photons emitted (after the detection of a genuine photon) by one SPAD detected by the second SPAD. The distance of the expected dip and the afterglow peak is characteristic for the setup.
To get rid of the afterglow peak it has been proven useful to introduce 2 identical bandpasses directly in front of each SPAD and to use a 50:50 beamsplitter plate instead of a beamsplitter cube or to misalign the detectors slightly.1)
Antibunching using Symphotime
- with PicoHarp 300 in T3-mode
- not possible with the SymPhoTime32, because in SymPhoTime32 the Sync Divider is always active and set to 8
- data acquisition is possible with the PicoHarp 300/HydraHarp 400 software as well as with SymPhoTime64, where the sync divider can be disabled. With HH, don't use use SYNC channel as input for one detector, but e.g. Ch. 1+2. SYNC must be plugged in. Unfortunately, analysis of HH T3-antibunching data is not implemented in SPT.
-
- measurements are possible with the SymPhoTime64
Changing from Normal Acquisition (T3-mode) to Antibunching (T2-mode)
Cabling: PicoHarp
- Disconnect Sync from PicoHarp 300 Ch0.
- Disconnect SPAD 1 Signal from Router (PHR800).
- Connect SPAD 1 to PicoHarp 300 Ch0 (Do not use the attenuator).
- Adjustment of the CFD Level for Ch 0 (Sync Channel) might be necessary.
- It is also possible to connect both Detectors directly to the PicoHarp 300 without passing SPAD 2 through the router. In this case, however, the router cable (DVI-cable) needs to be disconnected from the PH300
- No special delay cables necessary
Cabling: HydraHarp
- Disconnect Sync from HydraHarp 400 Ch0. (thats all)
- if Laser is attached via SEPIA II driver, it's enough to disable the SYNC in the SEPIA software ⇒ no cable change necessary
Software Settings during Acquisition


- diffusing Samples: typically just point measurement in T2-mode (see below)
-
- for example see Diamond NV centers
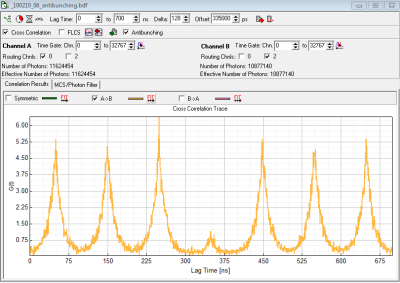
- depending on preference set laser repetition rate in order to allow full fluorescence to fully decay or highest possible rate or cw-excitation. The advantage of the highest possible repetition rate (or even cw) is better resolvability of the dip, disadvantage is that fluorescence does not decay completely during the pulses. (Compare figure 1 (10MHz) rep. rate and figure 2 (40 MHz) rep rate).
- Select T2-mode
- Start Point Measurement
- For a single immobilized molecule antibunching trace you will need at least a trace of 30s fluorescence emission with a minimum mean countrate of 10 kcps.
Analysis in SymPhoTime
- Select FCS Analysis
- Select CrossCorrelation and Antibunching
- Left Correlation Channel:
- PicoHarp 300: Select Ch0 (this is now SPAD 1)
- HydraHarp 400: Select Ch1 SPAD 1)
- Right Correlation Channel:
- PicoHarp 300 (SPAD 2 connected to Ch2 of the Router) Select Ch2 (SPAD 2)
- PicoHarp 300 (w/o Router) Select Ch1 (SPAD2)
- HydraHarp 400 select Ch2 (SPAD 2)
- LagTime To: select few multiples of the Laser Repetition Rate (e.g. for 10 MHz select 700 ns – so you will see 7 peaks)
- Delta is the step width of the lag-time axis in units of the PicoHarp 300 Resolution.
- e.g. for 32 ps Resolution Setting, selecting a Delta = 128 will result in approx. 4 ns steps for the x-Axis of the correlation.
- Start with lag-time/200/T2-resolution (e.g. 700ns/200/32ps ~=110; this means your x-scale will have 198 points, resolution will be 3.52 ns).
- Higher Delta values will speed up the calculation but result in a coarser correlation curve.
- Offset is the delay (in ps) between the two Detectors
- HydraHarp 400: in a MicroTime200 with HydraHarp detection both detectors including cables+ electronics have the same delay. Offset = 0 will show the dip at lagtime =0 (see figure 2).
- PicoHarp 300 in a MT200 with PH both detectors including cables+electronics have a different delay - in our case it is in the region of -15000 (15 ns) due to the router.
- However to move the expected “dip” to the center of the x-axis we here use the half of the x-axis range minus the difference in cable length (700ns/2 - 15 ns =335000 ps). (see figure 1)
- Start Correlation Calculation
The symmetric correlation, which is shown automatically will only show a small “dip” as it is the average of AxB AND BxA in the case of figure 1 AxB will have its dip at 350 ns and BxA will have its dip at -350 ns. Therefore only one of both correlation (here AxB) should be displayed.
Some MT200 based literature about Antibunching
- Yuan C. T., Yu P., Ko H. C., Huang J., Tang J.: Antibunching single-photon emission and blinking suppression of CdSe/ZnS quantum dots. In: ACS Nano. Vol. 03, p.3051-3056 (2009).
- Koberling F., Kraemer B., Buschmann V., Rüttinger S., Kapusta P., Patting M., Wahl M., Erdmann R: Recent advances in photon coincidence measurements for photon antibunching and full correlation analysis. In: Proceedings of SPIE. Vol.7185, 71850Q (2009).
- Fore S., Laurence T.A., Hollars C. W., Huser T.: Counting constituents in molecular complexes by fluorescence photon antibunching IEEE Journal of Selected Topics. In: Quantum Electronics. Vol.13, p.0996-1005 (2007)
- Nettels D., Gopich I. V., Hoffmann A., Schuler B: Ultrafast dynamics of protein collapse from single-molecule photon statistics. In: Proceedings of the National Academy of Sciences of USA. Vol.104, p.02655-02660 (2007)
- Ta H., Kiel A., Wahl M., Herten D.-P.: Experimental approach to extend the range for counting fluorescent molecules based on photon-antibunching Physical Chemistry Chemical Physics, Vol.12, p.10295-10300 (2010)
Comments
A software to convert ht3 files into ht2 files is available in the PicoQuant Community Forum: http://forum.picoquant.com/viewtopic.php?f=30&t=9
